文档模态
文档模态概述
UDB-TX 文档模态是基于九有数据库平台构建的企业级文档数据库解决方案。它将 JSON、BSON 等半结构化文档的灵活存储能力与关系型数据库的事务、可靠性和运维能力相结合,适合管理字段不固定、层次较深或持续演化的数据。
文档模态通过 UDB-FX 提供文档存储与查询能力,并可通过 UDB-FX-Proxy 兼容 MongoDB 5.0 及以上版本的通信协议。用户既可以使用 SQL 和 ud_fxdb_api 接口操作文档,也可以使用 MongoDB Shell 或 MongoDB 驱动连接数据库,便于迁移和集成已有应用。
核心特性:
灵活的文档模型:支持 JSON、BSON 文档及嵌套对象、数组等复杂结构,同一集合中的文档可以包含不同字段
多种访问方式:支持 SQL、文档数据库 API、MongoDB Shell 及多语言 MongoDB 驱动
丰富的数据操作:支持文档增删改查、集合管理、聚合、跨集合关联和索引管理
MongoDB 协议兼容:通过 UDB-FX-Proxy 对接现有 MongoDB 客户端和应用,降低迁移与改造成本
高可用部署:支持代理与数据库分离部署、多实例部署、读写分离及外部负载均衡
企业级安全:继承 UDB-TX 的事务、备份、主从复制和权限管理能力,并支持国密传输认证
典型应用场景:
内容与商品管理:存储结构差异较大的文章、商品属性、目录和元数据
用户与业务档案:管理用户画像、患者档案、订单及其他持续扩展的业务对象
日志与事件数据:保存来源多样、字段动态变化的日志、审计和事件记录
MongoDB 应用迁移:通过兼容协议复用 MongoDB Shell、驱动及现有应用代码
混合数据处理:在同一数据库平台中联合处理文档数据与关系型数据
UDB-TX 文档模态在保留文档模型灵活性的同时,为业务提供统一的数据管理、可靠性和运维体系。
文档引擎
简介
UDB-FX 是文档模态的核心引擎,以 BSON 文档为主要存储和处理对象。文档不需要预先定义固定模式(schema),相同集合(collection)中的文档可以具有不同字段和结构。用户可以根据业务变化逐步扩展文档结构,并通过索引、过滤、聚合等能力高效访问数据。
前提要求
已经安装UDB-TX。
启用文档模态
unvdb=# SELECT ud_enable_component('udb-fx', true);
ud_enable_component
---------------------

(1 row)
验证安装
SELECT name, enabled FROM ud_components WHERE name = 'udb-fx';
  name  | enabled
--------+---------
 udb-fx | t
(1 row)
系统架构

UDB-FX-Proxy 高可用架构
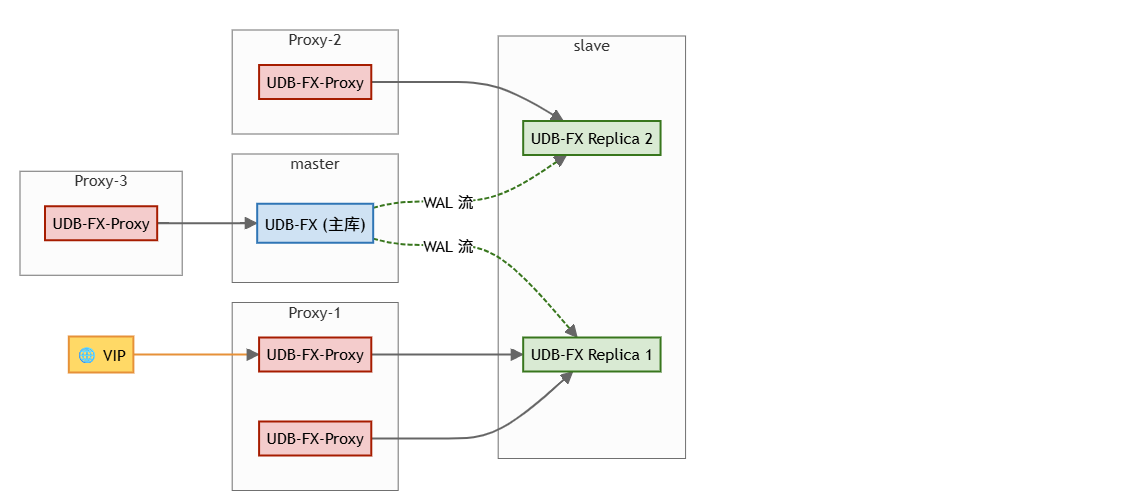
UDB-FX-Proxy 与 UDB-TX 部署在同一台机器:适合开发或测试环境
生产环境:推荐将 UDB-FX-Proxy 与 UDB-TX 分离部署,并配置数据库副本
多实例部署:写代理连接 UDB-TX 主节点,读代理连接 UDB-TX 从节点
多个 UDB-FX-Proxy 节点需要通过 HAProxy、Nginx TCP 等外部负载均衡组件统一提供服务
安装与启动
Linux 二进制包安装 UDB-FX
安装数据库
准备
创建普通用户,比如 useradd udb
上传并解压安装包,比如 tar zxf soft.tar.gz -C /data/soft/ 解压到/data/soft/目录
修改安装包用户属性,比如 chown -R udb.udb /data/soft
确保普通用户对数据目录有可写权限
注意 使用winscp或者其他上传工具,尽量不要使用lszrz 此插件有不明问题,数据包一但超过一定大小就有几率会在上传时产生损坏,导致文件出错不可用。
启动安装程序
[root@localhost soft]# su udb #切换到普通用户
[udb@localhost soft]$ ./setup.sh
===============================================================================
Welcome
-------
This installer will guide you through the installation of UnvDB.
Version:  22.4
Web:      http://www.unvdb.com
Tel:      0755-84185890
You may quit the installer by typing "Exit",
or press <ENTER> key to continue:       #此段是说明回车就行
===============================================================================
License Agreement
-----------------
Installation and Use of UnvDB Requires Acceptance of the Following
License Agreement:
UniversalDB (Shenzhen) Technology Co., Ltd.
"SOFTWARE END-USER LICENSE AGREEMENT"
The "software product" includes computer software, and may include
associated media, documentation.
This "software product" includes any upgrade and supplemental
materials to the original "software product" provided by UnvDB.
SOFTWARE PRODUCT LICENSE
The "software product" is under the protection of Copyrights
and International Conventions.
You may disagree the license by typing "Exit",
or press <ENTER> key to continue:        #此段是用户协议同意回车就行不同意"Exit"
===============================================================================
Choose Data Folder
------------------
Please choose a data folder for this installation.
The data folder must be empty and writable.
Default Data Folder: /data/unvdb-data
Enter the absolute path,
or press <ENTER> key to accept the default,
    : /data/unvdb-data #此处输入数据存放目录,如果输入错误,请按 Ctrl+Backspace 删除
===============================================================================
Port
----
Please enter UnvDB listen port.
Port (Default: 5678):
===============================================================================
Username
--------
Please enter UnvDB username.
Username (Default: unvdb): #管理员用户名
===============================================================================
Password
--------
Please enter password: #管理员密码
Password again
--------------
Please enter password again :  #再输入一次
===============================================================================
Ready To Install
----------------
It will start to install UnvDB.
Product Name: UnvDB v22.4
Data Folder: /data/unvdb-data
Port: 5678
Username: unvdb
You may quit the installer by typing "Exit",
or press <ENTER> key to continue:
The files belonging to this database system will be owned by user "unvdb".
This user must also own the server process.
The database cluster will be initialized with locale "en_US.UTF-8".
The default database encoding has accordingly been set to "UTF8".
The default text search configuration will be set to "english".
Data page checksums are disabled.
fixing permissions on existing directory /data/unvdb-data ... ok
creating subdirectories ... ok
selecting dynamic shared memory implementation ... posix
selecting default max_connections ... 100
selecting default shared_buffers ... 128MB
selecting default time zone ... Asia/Shanghai
creating configuration files ... ok
running bootstrap script ... ok
performing post-bootstrap initialization ... ok
syncing data to disk ... ok
===============================================================================
Installation Complete
---------------------
Congratulations. UnvDB has been successfully installed to:
    /data/unvdb-data
It is a demo version now, free use for 90 days.
To run as official version,
Contact UniversalDB(Shenzhen) Technology Co.,Ltd.
And copy license file to the installed path.
If you want to register UnvDB as service, please run
    sudo /data/unvdb-data/service.sh
or start UnvDB without service, please run
    /data/unvdb-data/start.sh
载入变量并验证
[udb@localhost soft]# exit #返回root用户
[root@localhost soft]# /data/unvdb-data/service.sh #注册服务
[root@localhost soft]# systemctl start unvdb #启动服务
[root@localhost soft]# source /data/unvdb-data/env.sh #载入环境变量
[root@localhost soft]# ud_sql  #进入udb
如果不是默认用户请输入# ud_sql -U 用户名 unvdb
由于ud_sql是登录默认用户所以不是默认用户使用的话会显示以下错误
[root@localhost soft]# ud_sql
ud_sql: error: connection to server at "localhost" (::1), port 5678 failed: FATAL:  role "unvdb" does not exist

[root@localhost ~]# ud_sql
ud_sql (22.4)
Type "help" for help.

unvdb=# \l
                              List of databases
   Name    | Owner | Encoding |   Collate   |    Ctype    | Access privileges
-----------+-------+----------+-------------+-------------+-------------------
 template0 | unvdb | UTF8     | zh_CN.UTF-8 | zh_CN.UTF-8 | =c/unvdb         +
           |       |          |             |             | unvdb=CTc/unvdb
 template1 | unvdb | UTF8     | zh_CN.UTF-8 | zh_CN.UTF-8 | =c/unvdb         +
           |       |          |             |             | unvdb=CTc/unvdb
 unvdb     | unvdb | UTF8     | zh_CN.UTF-8 | zh_CN.UTF-8 |
(3 rows)
启动数据库
./start.sh
启动UDB_FX_PROXY
注:UDB_FX_PROXY 需要一个固有用户来与unvdb连接,一般使用setup时的用户密码和数据库。更改删除需要重新启动UDB_FX_PROXY
默认用户和数据库
./UDB-FX-Proxy --mode="normal" --listen-addr="0.0.0.0:27017" --postgresql-url='postgres://unvdb:<password>@127.0.0.1:5678/<database>'
Setup时手动设置用户密码和数据库需要
./UDB-FX-Proxy --mode="normal" --listen-addr="0.0.0.0:27017" --postgresql-url='postgres://<user>:<password>@127.0.0.1:<port>/<database>'
卸载数据库
注意 请备份好数据再执行以下操作
systemctl stop {unvdb,udb_exporter,node_exporter,filebeat} #停止 数据库,数据库监控,服务器监控,日志文件收集 服务
rm -fr /lib/systemd/system/{unvdb.service,udb_exporter.service,filebeat.service,node_exporter.service} #删除服务文件
mv /data/unvdb-data/ /data/unvdb-data-del #转移数据目录,如确定不再需要也可 rm 删除
userdel -r udb #删除用户和目录,请提前备份用户目录内的数据
rm -fr /tmp/ud_autoctl #删除临时文件
文档数据操作
使用ud_sql连接数据库后
创建集合
ud_fxdb 提供 ud_fxdb_api.create_collection 函数可以在不创建数据库的情况下创建集合,实现BSON文档高效管理。
SELECT ud_fxdb_api.create_collection('ud_fxdb','patient');
CRUD 操作
插入
ud_fxdb_api.insert_one向ud_fxdb集合插入一条数据
select ud_fxdb_api.insert_one('ud_fxdb','patient', '{ "patient_id": "P001", "name": "Alice Smith", "age": 30, "phone_number": "555-0123", "registration_year": "2023","conditions": ["Diabetes", "Hypertension"]}');
select ud_fxdb_api.insert_one('ud_fxdb','patient', '{ "patient_id": "P002", "name": "Bob Johnson", "age": 45, "phone_number": "555-0456", "registration_year": "2023", "conditions": ["Asthma"]}');
select ud_fxdb_api.insert_one('ud_fxdb','patient', '{ "patient_id": "P003", "name": "Charlie Brown", "age": 29, "phone_number": "555-0789", "registration_year": "2024", "conditions": ["Allergy", "Anemia"]}');
select ud_fxdb_api.insert_one('ud_fxdb','patient', '{ "patient_id": "P004", "name": "Diana Prince", "age": 40, "phone_number": "555-0987", "registration_year": "2024", "conditions": ["Migraine"]}');
select ud_fxdb_api.insert_one('ud_fxdb','patient', '{ "patient_id": "P005", "name": "Edward Norton", "age": 55, "phone_number": "555-1111", "registration_year": "2025", "conditions": ["Hypertension", "Heart Disease"]}');
读取
使用 ud_fxdb_api.collection 在集合里检索文档
SELECT document FROM ud_fxdb_api.collection('ud_fxdb','patient');
在查询里使用过滤器
SET search_path TO ud_fxdb_api, ud_fxdb_core;
SET ud_fxdb_core.bsonUseEJson TO true;

SELECT cursorPage FROM ud_fxdb_api.find_cursor_first_page('ud_fxdb', '{ "find" : "patient", "filter" : {"patient_id":"P005"}}');
范围查询
SELECT cursorPage FROM ud_fxdb_api.find_cursor_first_page('ud_fxdb', '{ "find" : "patient", "filter" : { "$and": [{ "age": { "$gte": 10 } },{ "age": { "$lte": 35 } }] }}');
更新
ud_fxdb_api.update
更新age对应的patient值为P004.
select ud_fxdb_api.update('ud_fxdb', '{"update":"patient", "updates":[{"q":{"patient_id":"P004"},"u":{"$set":{"age":14}}}]}');
更新多个属性
SELECT ud_fxdb_api.update('ud_fxdb', '{"update":"patient", "updates":[{"q":{},"u":{"$set":{"age":24}},"multi":true}]}');
删除
使用ud_fxdb_api.delete
SELECT ud_fxdb_api.delete('ud_fxdb', '{"delete": "patient", "deletes": [{"q": {"patient_id": "P002"}, "limit": 1}]}');
集合管理
查询集合 ud_fxdb_api.list_collections_cursor_first_page
SELECT * FROM ud_fxdb_api.list_collections_cursor_first_page('ud_fxdb', '{ "listCollections": 1 }');
查询索引
ud_fxdb_api.list_indexes_cursor_first_pageud_fxdb_api.list_collections_cursor_first_page`.
列出 patient 集合上的所有索引
SELECT ud_fxdb_api.list_indexes_cursor_first_page('ud_fxdb','{"listIndexes": "patient"}');
ttl 索引默认通过pg_cron调度,可以在cron.job表上查询ttl索引信息
select * from cron.job;
索引
创建索引
ud_fxdb 使用 ud_fxdb_api.create_indexes_background 函数,可以在不中断数据操作的情况下创建索引
在ud_fxdb 的病人集合中创建 age 的单字段索引。
SELECT * FROM ud_fxdb_api.create_indexes_background('ud_fxdb', '{ "createIndexes": "patient", "indexes": [{ "key": {"age": 1},"name": "idx_age"}]}');
在 ud_fxdb 的病人集合中为 age 和 registration_year 字段创建复合索引。
SELECT * FROM ud_fxdb_api.create_indexes_background('ud_fxdb', '{ "createIndexes": "patient", "indexes": [{ "key": {"registration_year": 1, "age": 1},"name": "idx_regyr_age"}]}');
删除索引
使用ud_fxdb_api.drop_indexes 从集合中删除索引
The SQL command demonstrates how to drop the index named id_ab_1 from the first_collection collection of the ud_fxdb.
CALL ud_fxdb_api.drop_indexes('ud_fxdb', '{"dropIndexes": "patient", "index":"idx_age"}');
聚合Group by
ud_fxdb provides the ud_fxdb_api.aggregate_cursor_first_pagefunction, for performing aggregations over the document store.
统计各个注册年份下的病人数量
SELECT cursorpage FROM ud_fxdb_api.aggregate_cursor_first_page('ud_fxdb', '{ "aggregate": "patient", "pipeline": [ { "$group": { "_id": "$registration_year", "count_patients": { "$count": {} } } } ] , "cursor": { "batchSize": 3 } }');
按年份分桶
SELECT cursorpage FROM ud_fxdb_api.aggregate_cursor_first_page('ud_fxdb', '{ "aggregate": "patient", "pipeline": [ { "$bucket": { "groupBy": "$registration_year", "boundaries": ["2022","2023","2024"], "default": "unknown" } } ], "cursor": { "batchSize": 3 } }');
分组并收集每年所有病人的 unique conditions
SELECT cursorpage FROM ud_fxdb_api.aggregate_cursor_first_page('ud_fxdb', '{ "aggregate": "patient", "pipeline": [ { "$group": { "_id": "$registration_year", "conditions": { "$addToSet": { "conditions" : "$conditions" } } } } ], "cursor": { "batchSize": 3 } }');
连接多个集合的数据
先创建一个 appointment 集合
select ud_fxdb_api.insert_one('ud_fxdb','appointment', '{"appointment_id": "A001", "patient_id": "P001", "doctor_name": "Dr. Milind", "appointment_date": "2023-01-20", "reason": "Routine checkup" }');
select ud_fxdb_api.insert_one('ud_fxdb','appointment', '{"appointment_id": "A002", "patient_id": "P001", "doctor_name": "Dr. Moore", "appointment_date": "2023-02-10", "reason": "Follow-up"}');
select ud_fxdb_api.insert_one('ud_fxdb','appointment', '{"appointment_id": "A004", "patient_id": "P003", "doctor_name": "Dr. Smith", "appointment_date": "2024-03-12", "reason": "Allergy consultation"}');
select ud_fxdb_api.insert_one('ud_fxdb','appointment', '{"appointment_id": "A005", "patient_id": "P004", "doctor_name": "Dr. Moore", "appointment_date": "2024-04-15", "reason": "Migraine treatment"}');
select ud_fxdb_api.insert_one('ud_fxdb','appointment', '{"appointment_id": "A007","patient_id": "P001", "doctor_name": "Dr. Milind", "appointment_date": "2024-06-05", "reason": "Blood test"}');
select ud_fxdb_api.insert_one('ud_fxdb','appointment', '{ "appointment_id": "A009", "patient_id": "P003", "doctor_name": "Dr. Smith","appointment_date": "2025-01-20", "reason": "Follow-up visit"}');
查询病人看过的医生和日期
SELECT cursorpage FROM ud_fxdb_api.aggregate_cursor_first_page('ud_fxdb', '{ "aggregate": "patient", "pipeline": [ { "$lookup": { "from": "appointment","localField": "patient_id", "foreignField": "patient_id", "as": "appointment" } },{"$unwind":"$appointment"},{"$project":{"_id":0,"name":1,"appointment.doctor_name":1,"appointment.appointment_date":1}} ], "cursor": { "batchSize": 3 } }');
MongoDB 协议访问
在 Linux 上安装 MongoDB Shell
在大多数 Linux 发行版中,可以通过包管理器来安装 MongoDB Shell。
centos7
yum install -y mongodb-mongosh
安装完成后,MongoDB Shell 将可以在命令行中通过 mongosh 命令启动。 (默认会使用setup时的用户密码和数据库)
mongosh 'mongodb://<user>:<password>@<ip>:<port>/<database>'
默认用户和数据库
mongosh 'mongodb://unvdb:<password>@127.0.0.1:27017/unvdb'
创建新用户
认证功能暂未支持,roles选项需要置空
db.createUser({
  user: 'newuser',
  pwd: 'newpassword',
  roles: []
})
mongosh 'mongodb://newuser:newpassword@127.0.0.1:27017/<database>'
用法
显示数据库列表:
test> show dbs;
ud_fxdb  0 B
切换数据库
test> use ud_fxdb;
switched to db ud_fxdb
ud_fxdb>
显示集合
ud_fxdb> show collections;
patient
插入文档
ud_fxdb> db.patient.insertOne({ name: "Alice", age: 30 });
{
  acknowledged: true,
  insertedId: ObjectId('684a377d0c02e056b069e328')
}
查询文档
ud_fxdb> db.patient.find();
[
  { _id: ObjectId('684a377d0c02e056b069e328'), name: 'Alice', age: 30 }
]
更新文档
ud_fxdb> db.patient.updateOne({ name: "Alice" }, { $set: { age: 31 } });
{
  acknowledged: true,
  insertedId: null,
  matchedCount: Long('1'),
  modifiedCount: Long('1'),
  upsertedCount: 0
}
删除文档
ud_fxdb> db.patient.deleteOne({ name: "Alice" });
{ acknowledged: true, deletedCount: 1 }
UDB-FX-Proxy 代理服务
java-MongoDB drivers 连接数据库
package org.example;
import com.mongodb.client.*;
import com.mongodb.client.MongoClients;
import org.bson.Document;


public class Main {
    public static void main(String[] args) {
        MongoClient client = MongoClients.create("mongodb://unvdb:unvdb@192.168.4.134:27017");
        MongoDatabase db = client.getDatabase("ud_fxdb");
        MongoCollection<Document> coll = db.getCollection("patient");
        // 3. 查询所有文档
        System.out.println("=== 查询所有文档 ===");
        FindIterable<Document> allDocs = coll.find();
        for (Document doc : allDocs) {
            System.out.println(doc.toJson());
        }
        client.close();
    }
}
输出
=== 查询所有文档 ===
{"_id": {"$oid": "6855325a6098b0eab869e328"}, "name": "Alice", "age": 30}
安装nginx 配置多个 UDB-FX-Proxy 实例
下载 nginx
wget https://nginx.org/download/nginx-1.28.0.tar.gz
安装 nginx
./configure
make && make install
配置nginx
worker_processes auto;
events { worker_connections 1024; }

stream {

    log_format stream '$remote_addr [$time_local] '
                       '$protocol $status $bytes_sent $bytes_received '
                       '$session_time';

    access_log /var/log/nginx/stream-access.log stream;

    # 上游服务器池
    upstream tcp_backend {
        # 轮询(默认)
        server 192.168.4.134:27017 weight=1 max_fails=3 fail_timeout=30s;
        server 192.168.4.134:27018 weight=1 max_fails=3 fail_timeout=30s;

        # 可选其它算法:
        # least_conn;
        # ip_hash;
        # hash $remote_addr consistent;
    }

    # 日志配置(可选)
    access_log /var/log/nginx/stream-access.log stream;
    error_log  /var/log/nginx/stream-error.log info;

    # 监听 TCP 端口
    server {
        listen       8081;               # 对外监听端口
        proxy_pass   tcp_backend;        # 转发到 upstream

        # 超时设置
        proxy_connect_timeout 1s;
        proxy_timeout         3s;

        # 缓冲区优化
        proxy_buffer_size     16k;

        # 可选:开启 proxy_protocol(如果前端使用了 proxy_protocol)
        # proxy_protocol on;
    }

}
启动nginx
./nginx -c /usr/local/nginx/conf/nginx.conf
配置nginx 地址
package org.example;

import com.mongodb.client.*;
import com.mongodb.client.MongoClients;
import org.bson.Document;


public class Main {
    public static void main(String[] args) {
        MongoClient client = MongoClients.create("mongodb://unvdb:unvdb@172.26.73.248:8081");
        MongoDatabase db = client.getDatabase("ud_fxdb");
        MongoCollection<Document> coll = db.getCollection("patient");
        // 3. 查询所有文档
        System.out.println("=== 查询所有文档 ===");
        FindIterable<Document> allDocs = coll.find();
        for (Document doc : allDocs) {
            System.out.println(doc.toJson());
        }
        client.close();
    }
}
输出
=== 查询所有文档 ===
{"_id": {"$oid": "6855325a6098b0eab869e328"}, "name": "Alice", "age": 30}
成功
MongoDB java drivers读写分离设置
UDB-FX-Proxy 不支持“自动主从发现” 没有 MongoDB replicaSet UDB-FX-Proxy 使用 UDB-TX 流复制但不实现 MongoDB 的 replica set 协议,所以驱动无法通过 isMaster 自动识别主与副本。它只能当作一组静态节点处理,无法像 MongoDB 那样自动选主 UDB-FX-Proxy 不识别 replicaSet 名称,建议不要加 replicaSet=。 启动多个 MongoClient 实例,每个连接对应一个 UDB-FX-Proxy 节点
%%{init: {"theme":"base","themeVariables":{"edgeLabelBackground":"#f9f9f9"}}}%%
graph LR
  subgraph 应用
    A[客户端]
  end

  subgraph "UDB‑FX‑Proxy"
    B["UDB‑FX-Proxy 只读"]
    C["UDB‑FX‑Proxy 主库"]
  end

  subgraph UDB-FX
    D["UDB‑FX 主数据库"]
    E["UDB‑FX 副本"]
  end

  A -->|连接到| B
  A -->|连接到| C
  B -->|只读| E
  C -->|写入/读取| D
  D -->|复制 - WAL Streaming| E

  %% 节点分类样式
  classDef client fill:#a8dadc,stroke:#457b9d,color:#000,stroke-width:2px;
  classDef proxyRead fill:#ffeb99,stroke:#f4a261,color:#000,stroke-width:2px;
  classDef proxyWrite fill:#ffd6a5,stroke:#e76f51,color:#000,stroke-width:2px;
  classDef primary fill:#90be6d,stroke:#2a9d8f,color:#000,stroke-width:2px;
  classDef replica fill:#8ecae6,stroke:#219ebc,color:#000,stroke-width:2px;

  class A client;
  class B proxyRead;
  class C proxyWrite;
  class D primary;
  class E replica;

  %% 连线样式
  linkStyle 2 stroke:#219ebc,stroke-width:2px,stroke-dasharray:5 2;
java示例代码
package org.example;
import com.mongodb.client.*;
import com.mongodb.client.MongoClients;
import com.mongodb.client.result.InsertOneResult;
import org.bson.Document;

import java.time.LocalDateTime;


public class Main {
    public static void main(String[] args) {


        String writeConnectionString = "mongodb://unvdb:unvdb@192.168.4.134:27017/?directConnection=true";

        MongoClient writeClient = MongoClients.create(writeConnectionString);
        MongoDatabase db2 = writeClient.getDatabase("ud_fxdb");
        MongoCollection<Document> coll2 = db2.getCollection("patient");
        // 构建要插入的新文档
        Document newDoc = new Document()
                .append("name", "张三")
                .append("age", 30)
                .append("createdAt", LocalDateTime.now());
        // 插入操作
        InsertOneResult result = coll2.insertOne(newDoc);
        System.out.println("插入成功,_id = " + result.getInsertedId());
        writeClient.close();


        //读取client
        String readconnectionString = "mongodb://unvdb:unvdb@192.168.4.134:27019/?directConnection=true";
        MongoClient readClient = MongoClients.create(readconnectionString);

        MongoDatabase db = readClient.getDatabase("ud_fxdb");
        ;
        MongoCollection<Document> coll = db.getCollection("patient");
        // 3. 查询所有文档
        System.out.println("=== 查询所有文档 ===");
        FindIterable<Document> allDocs = coll.find();
        for (Document doc : allDocs) {
            System.out.println(doc.toJson());
        }
        readClient.close();
    }
}
国密认证
制作数字证书
在安装UDB-TX完成后,进入bin目录,执行命令
./gen.sh path
自动生成并安装证书, path 是数据库的数据路径。比如/home/soft/unvdb-data/ 执行完上述命令,服务器的证书文件将会自动拷贝到数据目录,客户端的证书文件 自动拷贝到~/.unvdb/目录下。
设置启用国密传输加密方式
a.在 unvdb-data 中修改 unvdbsvr.conf 文件。 修改结果如下:
# - SSL -

ssl = on
ssl_use_tlcp = on
ssl_ca_file = 'cacert.pem'
#ssl_crl_file = ''
#ssl_crl_dir = ''
ssl_cert_file = 'server.crt'
ssl_key_file = 'server.key'
ssl_enc_cert_file = 'server_enc.crt'
ssl_enc_key_file = 'server_enc.key'
#ssl_ciphers = 'HIGH:MEDIUM:+3DES:!aNULL' # allowed SSL ciphers
ssl_ciphers = 'ECDHE-RSA-AES128-GCM-SHA256:ECDHE-RSA-AES256-GCM-SHA384:ECDHE-ECDSA-AES128-GCM-SHA256:ECDHE-ECDSA-AES256-GCM-SHA384:DHE-RSA-AES128-GCM-SHA256:DHE-RSA-AES256-GCM-SHA384:ECDHE-SM4-SM3:ECDHE-SM4-GCM-SM3:' # allowed SSL ciphers, support GMSSL
#ssl_prefer_server_ciphers = on
#ssl_ecdh_curve = 'prime256v1'
ssl_ecdh_curve = 'SM2'  #support GMSSL
#ssl_min_protocol_version = 'TLSv1.2'
#ssl_max_protocol_version = ''
#ssl_dh_params_file = ''
#ssl_passphrase_command = ''
#ssl_passphrase_command_supports_reload = off
修改方式:将上图中红框内的参数前的#删除,并将ssl和ssl_use_tlcp的值改为on 即可
在 unvdb-data中修改 ud_ident.conf 添加
# MAPNAME       SYSTEM-USERNAME         UD-USERNAME
certmap  client   unvdb
在 unvdb-data 中修改 ud_hba.conf 文件。 在参数中增加:
hostssl all all 0.0.0.0/0 cert map=certmap
运行
ud_sql "host=127.0.0.1 port=5678 dbname=unvdb user=unvdb ssltlcp=1"
连接成功
[unvdb@x86 ~]$ ud_sql "host=192.168.4.134 port=5678 dbname=unvdb user=unvdb ssltlcp=1"
ud_sql (UDB-TX V2.4(build:24.2.13.1 sha1:35ab28ee))
SSL connection (protocol: GMTLSv1.1, cipher: ECDHE-SM4-SM3, compression: off)
Type "help" for help.

unvdb=#
设置 UDB-FX-Proxy TLCP连接和TLCP监听
bin/UDB-FX-Proxy --mode="normal" \
--listen-addr="0.0.0.0:27017" \
--listen-tlcp="0.0.0.0:27019" \
--listen-tlcp-cert-file="/home/unvdb/unvdb-data/server.crt" \
--listen-tlcp-key-file="/home/unvdb/unvdb-data/server.key" \
--listen-tlcp-ca-file="/home/unvdb/unvdb-data/cacert.pem" \
--listen-tlcp-enc-cert-file="/home/unvdb/unvdb-data/server_enc.crt" \
--listen-tlcp-enc-key-file="/home/unvdb/unvdb-data/server_enc.key" \
--postgresql-url='postgres://unvdb:unvdb@192.168.4.134:5678/?ssltlcp=1&sslrootcert=/home/unvdb/.unvdb/cacert.pem&sslcert=/home/unvdb/.unvdb/client.crt&sslkey=/home/unvdb/.unvdb/client.key&sslenccert=/home/unvdb/.unvdb/client_enc.crt&sslenckey=/home/unvdb/.unvdb/client_enc.key'
国密TLCP暂时无法用mongosh工具进行连接,因为不支持TLCP
用 mongo-java-driver 进行TLCP连接
因为java使用p12格式的证书,所以要提前把客户端证书转成p12格式 kona-pkix-1.0.17.jar;kona-crypto-1.0.17.jar 文件在 https://repo.maven.apache.org/maven2/com/tencent/kona/ 下载
openssl pkcs8 -topk8 -outform PEM -in client.key -out client.key.pem -nocrypt

openssl pkcs8 -topk8 -outform PEM -in client_enc.key -out client_enc.key.pem -nocrypt

#正确的方案:使用 Kona 自带的 KeyTool 工具,直接生成国密证书和 keystore
java -cp "kona-pkix-1.0.17.jar;kona-crypto-1.0.17.jar" com.tencent.kona.pkix.tool.KeyStoreTool -type PKCS12 -store both_clients.p12 -storePasswd 123456 -alias client_sign -keyAlgo EC -key client.key.pem -keyPasswd 123456 -certs client.crt -ca cacert.pem

#正确的方案:使用 Kona 自带的 KeyTool 工具,直接生成国密证书和 keystore
java -cp "kona-pkix-1.0.17.jar;kona-crypto-1.0.17.jar" com.tencent.kona.pkix.tool.KeyStoreTool -type PKCS12 -store both_clients.p12 -storePasswd 123456 -alias client_enc -keyAlgo EC -key client_enc.key.pem -keyPasswd 123456 -certs client_enc.crt -ca cacert.pem

# 生成含根 CA 的 truststore
java -cp "kona-pkix-1.0.17.jar;kona-crypto-1.0.17.jar" com.tencent.kona.pkix.tool.KeyStoreTool -type PKCS12 -alias ca -keyAlgo EC  -certs cacert.pem -store truststore.p12 -storePasswd 123456
添加java 依赖
<dependencies>
        <dependency>
            <groupId>com.tencent.kona</groupId>
            <artifactId>kona-crypto</artifactId>
            <version>1.0.17</version>
        </dependency>
        <dependency>
            <groupId>com.tencent.kona</groupId>
            <artifactId>kona-pkix</artifactId>
            <version>1.0.17</version>
        </dependency>
        <dependency>
            <groupId>com.tencent.kona</groupId>
            <artifactId>kona-ssl</artifactId>
            <version>1.0.17</version>
        </dependency>
        <dependency>
            <groupId>com.tencent.kona</groupId>
            <artifactId>kona-provider</artifactId>
            <version>1.0.17</version>
        </dependency>

        <dependency>
            <groupId>org.mongodb</groupId>
            <artifactId>mongodb-driver-sync</artifactId>
            <version>5.0.0</version>
        </dependency>

        <!-- SLF4J 日志接口 -->
        <dependency>
            <groupId>org.slf4j</groupId>
            <artifactId>slf4j-api</artifactId>
            <version>1.7.36</version>
        </dependency>

        <!-- 日志实现:simple 版本,控制台输出日志 -->
        <dependency>
            <groupId>org.slf4j</groupId>
            <artifactId>slf4j-simple</artifactId>
            <version>1.7.36</version>
        </dependency>
    </dependencies>
java代码
package org.example;

import com.mongodb.ConnectionString;
import com.mongodb.MongoClientSettings;
import com.mongodb.client.*;
import com.mongodb.client.MongoClients;
import com.tencent.kona.KonaProvider;
import org.bson.Document;
import javax.net.ssl.KeyManagerFactory;
import javax.net.ssl.SSLContext;
import javax.net.ssl.TrustManagerFactory;
import java.io.FileInputStream;
import java.security.KeyStore;
import java.security.SecureRandom;
import java.security.Security;

public class Main {
    public static void main(String[] args) throws Exception {
        mongoTlCP();
    }

    public static SSLContext createTlcpContext() throws Exception {
        Security.addProvider(new KonaProvider());

        KeyStore keyStore = KeyStore.getInstance("PKCS12",  "Kona");
        try (FileInputStream kis = new FileInputStream("both_clients.p12")) {
            keyStore.load(kis, "123456".toCharArray());
        }
        KeyManagerFactory kmf = KeyManagerFactory.getInstance("NewSunX509");
        kmf.init(keyStore, "123456".toCharArray());

        KeyStore trustStore = KeyStore.getInstance("PKCS12","Kona");
        try (FileInputStream tis = new FileInputStream("truststore.p12")) {
            trustStore.load(tis, "123456".toCharArray());
        }
        TrustManagerFactory tmf = TrustManagerFactory.getInstance("PKIX", "Kona");
        tmf.init(trustStore);

        SSLContext ctx = SSLContext.getInstance("TLCPv1.1");
        ctx.init(kmf.getKeyManagers(), tmf.getTrustManagers(), new SecureRandom());
        return ctx;
    }


    public static void mongoTlCP() throws Exception {
        SSLContext sslContext = createTlcpContext();

        MongoClientSettings settings = MongoClientSettings.builder()
                .applyToSslSettings(b -> b.enabled(true)
                        .context(sslContext)
                        .invalidHostNameAllowed(true))
                .applyConnectionString(new ConnectionString("mongodb://unvdb:unvdb@192.168.4.134:27019"))
                .build();

        try (MongoClient mongoClient = MongoClients.create(settings)) {
            MongoDatabase database = mongoClient.getDatabase("ud_fxdb");
            MongoCollection<Document> collection = database.getCollection("patient");

            FindIterable<Document> documents = collection.find();
            for (Document doc : documents) {
                System.out.println(doc.toJson());
            }
        }
    }
}
用 mongo-go-driver 进行TLCP连接
请联系技术支持获取mongo-go-driver驱动
package main

import (
	"context"
	"fmt"
	"log"
	"os"
	"time"

	"git.unvdb.com/UDB-TX_grp/UDB-TX_drv/udb-mongo-driver-go/v2/bson"
	"git.unvdb.com/UDB-TX_grp/UDB-TX_drv/udb-mongo-driver-go/v2/mongo"
	"git.unvdb.com/UDB-TX_grp/UDB-TX_drv/udb-mongo-driver-go/v2/mongo/options"
	"gitee.com/Trisia/gotlcp/tlcp"
	"github.com/emmansun/gmsm/smx509"
)

func main() {
	// 1. 加载服务端根 CA
	pool := smx509.NewCertPool()
	pemData, err := os.ReadFile("/root/unvdb_cert/cacert.pem")
	if err != nil {
		panic(err)
	}
	ca, err := smx509.ParseCertificatePEM(pemData)
	if err != nil {
		panic(err)
	}
	pool.AddCert(ca)
	// 2. 加载客户端签名证书(用于认证身份)
	authCert, err := tlcp.LoadX509KeyPair("/roo  t/unvdb_cert/client/client.crt", "/root/unvdb_cert/client/client.key")
	if err != nil {
		panic(err)
	}
	// 3. 加载客户端加密证书(用于 ECDHE 密钥交换)
	encCert, err := tlcp.LoadX509KeyPair("/root/unvdb_cert/client/client_enc.crt", "/root/unvdb_cert/client/client_enc.key")
	if err != nil {
		panic(err)
	}
	// 4. 构建 TLCP 配置,启用双向认证并指定密码套件顺序
	config := &tlcp.Config{
		RootCAs:      pool,
		Certificates: []tlcp.Certificate{authCert, encCert},
		CipherSuites: []uint16{
			tlcp.ECDHE_SM4_GCM_SM3,
			tlcp.ECDHE_SM4_CBC_SM3,
		},
	}
	ctx, cancel := context.WithTimeout(context.Background(), 10*time.Second)
	defer cancel()
	client, err := mongo.Connect(options.Client().ApplyURI("mongodb://unvdb:unvdb@192.168.4.134:27019").SetTLCPConfig(config)) //设置TLCP配置
	if err != nil {
		log.Fatal(err)
	}
	defer client.Disconnect(ctx)
	coll := client.Database("ud_fxdb").Collection("patient")
	cursor, err := coll.Find(ctx, bson.D{}) // 空过滤器抓取所有文档
	if err != nil {
		log.Fatal(err)
	}
	defer cursor.Close(ctx)
	var docs []bson.M
	if err := cursor.All(ctx, &docs); err != nil {
		log.Fatal(err)
	}
	for _, doc := range docs {
		fmt.Println(doc)
	}
}
MongoDB 功能支持列表
数据库命令
| 命令 | 支持情况 |
|---|---|
| change streams | 否 |
| delete | 是 |
| eval | 3.0以后已废弃 |
| find | 是 |
| findAndModify | 是 |
| getLastError | 是(4.2以后删除,使用WriteConcern 替代) |
| getMore | 否 |
| getPrevError | 否 |
| insert | 是 |
| parallelCollectionScan | 否(4.2移除) |
| resetError | 否 |
| update | 是 |
查询和写入命令:支持
事务命令
| 命令 | 支持情况 |
|---|---|
| abortTransaction | 否(协议层未实现session abortTransaction |
| commitTransaction | 否(协议层未实现session commitTransaction) |
管理命令
| 命令 | 支持情况 |
|---|---|
| cloneCollectionAsCapped | 否 |
| collMod | 是 |
| connectionStatus | 是 |
| convertToCapped | 否 |
| copydb | 废弃 |
| create | 是 |
| createIndexes | 是 |
| currentOp | 是 |
| drop | 是 |
| dropDatabase | 是 |
| dropIndexes | 是 |
| filemd5 | 否 |
| killCursors | 是 |
| killOp | 否 |
| listCollections | 是 |
| listDatabases | 是(list_databases) |
| listIndexes | 是(list_indexes_cursor_first_page) |
| reIndex | 是) |
| renameCollection | 是 |
诊断命令
| 命令 | 支持情况 |
|---|---|
| buildInfo | 是 |
| collStats | 否 |
| connPoolStats | 否 |
| connectionStatus | 是 |
| dataSize | 是 |
| dbHash | 否 |
| dbStats | 是 |
| explain | 是 |
| features | 否 |
| hostInfo | 是 |
| listDatabases | 是 |
| listCommands | 是 |
| profiler | 否 |
| serverStatus | 是 |
| top | 否 |
| whatsmyuri | 是 |
聚合命令
命令支持
| 命令 | 支持情况 |
|---|---|
| aggregate | 是 |
| count | 是 |
| distinct | 是 |
| mapReduce | 否 |
聚合阶段支持
| 阶段 | 支持情况 |
|---|---|
| addFields | 是 |
| bucket | 是 |
| bucketAuto | 是 |
| changeStream | 是 |
| collStats | 否 |
| count | 是 |
| currentOp | 否 |
| facet | 是 |
| geoNear | 是 |
| graphLookup | 否 |
| group | 是 |
| indexStats | 否 |
| limit | 是 |
| listLocalSessions | 否 |
| listSessions | 否 |
| lookup | 部分 |
| match | 是 |
| merge | 是 |
| out | 是 |
| planCacheStats | 否 |
| project | 是 |
| redact | 是 |
| regexFind | 是 |
| regexFindAll | 是 |
| regexMatch | 是 |
| replaceRoot | 是 |
| replaceWith | 是 |
| sample | 是 |
| set | 是 |
| skip | 是 |
| sort | 是 |
| sortByCount | 是 |
| unset | 是 |
| unwind | 是 |
表达式
布尔表达式
| 表达式 | 支持 |
|---|---|
| and | 是 |
| not | 是 |
| or | 是 |
转换表达式
| 表达式 | 支持 |
|---|---|
| convert | 是 |
| toBool | 是 |
| toDate | 是 |
| toDecimal | 是 |
| toDouble | 是 |
| toInt | 是 |
| toLong | 是 |
| toObjectId | 是 |
| toString | 是 |
集合表达式
| 表达式 | 支持 |
|---|---|
| setEquals | 是 |
| setIntersection | 是 |
| setUnion | 是 |
| setDifference | 是 |
| setIsSubset | 是 |
| anyElementTrue | 是 |
| allElementsTrue | 是 |
比较表达式
| 表达式 | 支持 |
|---|---|
| cmp | 是 |
| eq | 是 |
| gt | 是 |
| gte | 是 |
| lt | 是 |
| lte | 是 |
| ne | 是 |
| in | 是 |
| nin | 是 |
算术表达式
| 表达式 | 支持 |
|---|---|
| abs | 是 |
| add | 是 |
| ceil | 是 |
| divide | 是 |
| exp | 是 |
| floor | 是 |
| ln | 是 |
| log | 是 |
| log10 | 是 |
| mod | 是 |
| multiply | 是 |
| pow | 是 |
| round | 是 |
| sqrt | 是 |
| subtract | 是 |
| trunc | 是 |
三角表达式
| 表达式 | 支持 |
|---|---|
| acos, acosh | 是 |
| asin, asinh | 是 |
| atan, atan2, atanh | 是 |
| cos, cosh | 是 |
| degreesToRadians | 是 |
| radiansToDegrees | 是 |
| sin, sinh | 是 |
| tan, tanh | 是 |
字符串表达式
| 表达式 | 支持 |
|---|---|
| concat | 是 |
| indexOfBytes, indexOfCP | 是 |
| ltrim, rtrim, trim | 是 |
| split | 是 |
| strLenBytes, strLenCP | 是 |
| strcasecmp | 是 |
| substr, substrBytes, substrCP | 是 |
| toLower, toUpper | 是 |
数组表达式
| 表达式 | 支持 |
|---|---|
| arrayElemAt | 是 |
| arrayToObject | 是 |
| concatArrays | 是 |
| filter | 是 |
| indexOfArray | 是 |
| isArray | 是 |
| objectToArray | 是 |
| range | 是 |
| reverseArray | 是 |
| reduce | 是 |
| size | 是 |
| slice | 是 |
| zip | 是 |
| in | 是 |
日期表达式
| 表达式 | 支持 |
|---|---|
| dayOfYear | 是 |
| dayOfMonth | 是 |
| dayOfWeek | 是 |
| year, month, week | 是 |
| hour, minute, second, millisecond | 是 |
| dateToString | 是 |
| isoDayOfWeek, isoWeek, isoWeekYear | 是 |
| dateFromParts, dateToParts, dateFromString | 是 |
条件表达式
| 表达式 | 支持 |
|---|---|
| cond | 是 |
| ifNull | 是 |
| switch | 是 |
累加器表达式
| 表达式 | 支持 |
|---|---|
| sum, avg | 是 |
| first, last | 是 |
| max, min | 是 |
| push, addToSet | 是 |
| stdDevPop, stdDevSamp | 是 |
系统变量
| 变量 | 支持 |
|---|---|
| \$\$CLUSTERTIME | 否 |
| \$\$CURRENT | 是 |
| \$\$DESCEND | 是 |
| \$\$KEEP | 是 |
| \$\$PRUNE | 是 |
| \$\$REMOVE | 是 |
| \$\$ROOT | 是 |
数据类型
| 类型 | 支持 |
|---|---|
| Double, String | 是 |
| Object, Array | 是 |
| Binary Data, ObjectId | 是 |
| Boolean, Date, Null | 是 |
| 32-bit Int, 64-bit Int | 是 |
| Timestamp, Decimal128 | 是 |
| MinKey, MaxKey | 是 |
| Regular Expression | 是 |
| JavaScript(含 Scope) | 是 |
| Undefined | 是 |
索引和属性
索引类型支持
| 索引类型 | 支持 |
|---|---|
| Single Field | 是 |
| Compound | 是 |
| Multikey | 是 |
| Text | 否 |
| 2dsphere | 是 |
| 2d | 否 |
| Hashed | 否 |
索引属性支持
| 属性 | 支持 |
|---|---|
| TTL | 是 |
| Unique | 是 |
| Partial | 仅用于唯一索引 |
| Case Insensitive | 否 |
| Sparse | 否 |
| Background | 是 |
查询运算符
变量运算符
| 运算符 | 支持 |
|---|---|
| map | 是 |
| let | 是 |
合并运算符
| 运算符 | 支持 |
|---|---|
| mergeObjects | 是 |
文本搜索运算符
| 运算符 | 支持 |
|---|---|
| meta | 否 |
数据类型运算符
| 运算符 | 支持 |
|---|---|
| type | 是 |
文本运算符
| 运算符 | 支持 |
|---|---|
| literal | 是 |
逻辑运算符
| 运算符 | 支持 |
|---|---|
| or | 是 |
| and | 是 |
| not | 是 |
| nor | 是 |
元素运算符
| 运算符 | 支持 |
|---|---|
| exists | 是 |
| type | 是 |
查询评估运算符
| 运算符 | 支持 |
|---|---|
| expr | 是 |
| jsonSchema | 否 |
| mod | 是 |
| regex | 是 |
| text | 否(使用 $regex 替代) |
| where | 否 |
数组运算符
| 运算符 | 支持 |
|---|---|
| all | 是 |
| elemMatch | 是 |
| size | 是 |
注释运算符
| 运算符 | 支持 |
|---|---|
| comment | 是 |
投影运算符
| 运算符 | 支持 |
|---|---|
| elemMatch | 是 |
| meta | 否 |
| slice | 是 |
更新运算符
字段更新运算符
| 运算符 | 支持 |
|---|---|
| inc, mul | 是 |
| rename | 是 |
| setOnInsert | 是 |
| set, unset | 是 |
| min, max | 是 |
| currentDate | 是 |
数组更新运算符
| 运算符 | 支持 |
|---|---|
| \$(位置运算符) | 是 |
| [] | 是 |
| addToSet, pop | 是 |
| pull, pullAll | 是 |
| push, pushAll | 是(已废弃) |
更新修饰符
| 修饰符 | 支持 |
|---|---|
| each | 是 |
| slice | 是 |
| sort | 是 |
| position | 是 |
位运算符
| 运算符 | 支持 |
|---|---|
| bit | 是 |
| bitsAllSet | 是 |
| bitsAnySet | 是 |
| bitsAllClear | 是 |
| bitsAnyClear | 是 |
地理空间运算符
| 运算符 | 支持 |
|---|---|
| \$geoWithin | 是 |
| \$geoIntersects | 是 |
| \$near | 是 |
| \$nearSphere | 是 |
| \$geometry | 是 |
| \$minDistance | 是 |
| \$maxDistance | 是 |
| \$center | 是 |
| \$centerSphere | 是 |
| \$box | 是 |
| \$polygon | 是 |
兼容性测试
UDB-FX-Proxy 命令和Mongodb5 兼容性
管理命令
| 命令 | 状态 |
|---|---|
| cloneCollectionAsCapped | ❌ 尚未实施 |
| collMod | ✅️ 支持 |
| compact | ✅️ 支持 |
| convertToCapped | ❌ 尚未实施 |
| create | ✅️ 支持 |
| createIndexes | ✅️ 支持 |
| currentOp | ✅️ 支持 |
| drop | ✅️ 支持 |
| dropConnections | ❌ 尚未实施 |
| dropDatabase | ✅️ 支持 |
| dropIndexes | ✅️ 支持 |
| getParameter | ✅️ 支持 |
| killCursors | ✅️ 支持 |
| killOp | ❌ 尚未实施 |
| listCollections | ✅️ 支持 |
| listDatabases | ✅️ 支持 |
| listIndexes | ✅️ 支持 |
| logRotate | ❌ 尚未实施 |
| reIndex | ✅️ 支持 |
| renameCollection | ✅️ 支持 |
| setParameter | ❌ 尚未实施 |
| shutdown | ❌ 尚未实施 |
聚合命令
| 命令 | 状态 |
|---|---|
| aggregate | ✅️ 支持 |
| count | ✅️ 支持 |
| distinct | ✅️ 支持 |
身份验证命令
| 命令 | 状态 |
|---|---|
| authenticate | ❌ 尚未实施 |
| logout | ✅️ 支持 |
| saslContinue | ✅️ 支持 |
| saslStart | ✅️ 支持 |
诊断命令
| 命令 | 状态 |
|---|---|
| buildInfo | ✅️ 支持 |
| collStats | ✅️ 支持 |
| connectionStatus | ✅️ 支持 |
| connPoolStats | ❌ 尚未实施 |
| dataSize | ✅️ 支持 |
| dbStats | ✅️ 支持 |
| explain | ✅️ 支持 |
| ferretDebugError | ✅️ 支持 |
| getCmdLineOpts | ✅️ 支持 |
| getLog | ✅️ 支持 |
| hostInfo | ✅️ 支持 |
| listCommands | ✅️ 支持 |
| logApplicationMessage | ❌ 尚未实施 |
| ping | ✅️ 支持 |
| profile | ❌ 尚未实施 |
| serverStatus | ✅️ 支持 |
| validate | ✅️ 支持 |
| whatsmyuri | ✅️ 支持 |
查询命令
| 命令 | 状态 |
|---|---|
| bulkWrite | ❌ 尚未实施 |
| delete | ✅️ 支持 |
| find | ✅️ 支持 |
| findAndModify | ✅️ 支持 |
| getMore | ✅️ 支持 |
| insert | ✅️ 支持 |
| update | ✅️ 支持 |
角色管理命令
| 命令 | 状态 |
|---|---|
| createRole | ❌ 尚未实施 |
| dropAllRolesFromDatabase | ❌ 尚未实施 |
| dropRole | ❌ 尚未实施 |
| grantPrivilegesToRole | ❌ 尚未实施 |
| grantRolesToRole | ❌ 尚未实施 |
| revokePrivilegesFromRole | ❌ 尚未实施 |
| revokeRolesFromRole | ❌ 尚未实施 |
| rolesInfo | ❌ 尚未实施 |
| updateRole | ❌ 尚未实施 |
会话命令
| 命令 | 状态 |
|---|---|
| abortTransaction | ❌ 尚未实施 |
| commitTransaction | ❌ 尚未实施 |
| endSessions | ✅️ 支持 |
| killAllSessions | ✅️ 支持 |
| killAllSessionsByPattern | ⚠️ 尚未完全实施 |
| killSessions | ✅️ 支持 |
| refreshSessions | ✅️ 支持 |
| startSession | ✅️ 支持 |
用户管理命令
| 命令 | 状态 |
|---|---|
| createUser | ✅️ 支持 |
| dropAllUsersFromDatabase | ✅️ 支持 |
| dropUser | ✅️ 支持 |
| grantRolesToUser | ❌ 尚未实施 |
| revokeRolesFromUser | ❌ 尚未实施 |
| updateUser | ✅️ 支持 |
| usersInfo | ✅️ 支持 |
数据 API
与 Atlas Data API 兼容的所有驱动程序和应用程序都应该与 FerretDB 兼容。
| 路径 | 状态 |
|---|---|
/action/aggregate |
✅️ 支持 |
/action/deleteMany |
✅️ 支持 |
/action/deleteOne |
✅️ 支持 |
/action/find |
✅️ 支持 |
/action/findOne |
✅️ 支持 |
/action/insertMany |
✅️ 支持 |
/action/insertOne |
✅️ 支持 |
/action/updateMany |
✅️ 支持 |
/action/updateOne |
✅️ 支持 |
FAQs(常见问题)
Q1: select 出来显示的是BSON十六进制数据
在当前会话设置
SET ud_fxdb_core.bsonUseEJson=true;
永久设置,在unvdbsvr.conf中添加
ud_fxdb_core.bsonUseEJson = true;
使用bson_to_json_string函数
SELECT ud_fxdb_core.bson_to_json_string(your_bson_column)
FROM your_table;